Web Deposit Workflow: Difference between revisions
Jump to navigation
Jump to search
(Created page with "There is a manual deposit process if File:Done.zip done zip") |
No edit summary |
||
| Line 1: | Line 1: | ||
There is a manual deposit | There is a manual deposit workbench for those who do not want to wait for a submission job to run. | ||
= Workflow = | |||
== Requirements == | |||
* Access to Rosetta back end. | |||
* A processed deposit. | |||
** See [New_Deposits] for information on how to put together a deposit. | |||
== Accessing Workbench == | |||
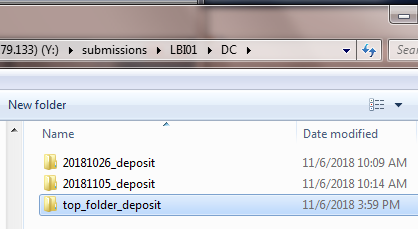
1. Move or copy the deposit folder to the appropriate submission folder. | |||
:: [[File:Manual dep 1a.png|700px|border]] | |||
2. Go to '''[http://digipres.cjh.org:1801]''' | |||
3. Click Rosetta Deposit. | |||
:: [[File:Manual dep 1.png|700px|border]] | |||
4. Log in with credentials. | |||
:: [[File:Manual dep 2.png|700px|border]] | |||
[[File:Done.zip done zip]] | 5. Click Add Deposit Activity. | ||
:: [[File:Manual dep 3.png|700px|border]] | |||
6. Choose Material Flow. | |||
::* CSV, Dublin Core (DC), METS | |||
:: [[File:Manual dep 4.png|700px|border]] | |||
7. Select the correct deposit folder and click Next. | |||
:: [[File:Manual dep 5.png|700px|border]] | |||
8. Confirm the Files location and click Submit Deposit. | |||
:: [[File:Manual dep 6.png|700px|border]] | |||
9. Make note of the SIP ID and monitor the deposit's progress by clicking "History." | |||
:: [[File:Manual dep 7.png|700px|border]] | |||
10. Add a done file to the deposit folder | |||
::* [http://wiki.cjh.org/index.php/File:Done.zip Download done.zip] | |||
::* Extract 'done' file from zip | |||
::* Place 'done' file inside deposit folder next to the content folder | |||
::: [[File:Manual dep 8.png|700px|border]] | |||
Revision as of 21:10, 6 November 2018
There is a manual deposit workbench for those who do not want to wait for a submission job to run.
Workflow
Requirements
- Access to Rosetta back end.
- A processed deposit.
- See [New_Deposits] for information on how to put together a deposit.
Accessing Workbench
1. Move or copy the deposit folder to the appropriate submission folder.
2. Go to [1] 3. Click Rosetta Deposit.
4. Log in with credentials.
5. Click Add Deposit Activity.
6. Choose Material Flow.
- CSV, Dublin Core (DC), METS
7. Select the correct deposit folder and click Next.
8. Confirm the Files location and click Submit Deposit.
9. Make note of the SIP ID and monitor the deposit's progress by clicking "History."
10. Add a done file to the deposit folder
- Download done.zip
- Extract 'done' file from zip
- Place 'done' file inside deposit folder next to the content folder
