DigiTool Migration Workflow
Developed by Kevin Powell in 2018 and 2019 to migrate Center for Jewish History assets from DigiTool to Rosetta.
DigiTool Migration Workflow Requirements
- Mapped Network Drive to at least one of the partners' Rosetta submission folders
- /storage1/operational_shared/submissions/[PARTNER_CODE]
- Mapped Network Drive to DigiTool server
- /storage6/bigstreams6/dtl-export
- Access to the Export Digital Entities job in DigiTool for at least 1 admin unit
Export from DigiTool
1. Make sure you are connected to the correct Admin Unit
- DigiTool → Connect To
2. Start Export Digital Entities Job
- Management → Maintenance → Submit New Job
- Choose Export Digital Entities from list
- Search for collection and/or objects to be migrated
- Click Next
- Set the Export directory
- [YYYYMMDD]-[PartnerCode]-[DescriptiveText]
- [YYYYMMDD] is the date format.
- E.g. 20180816 = August 16th, 2018
- [PartnerCode]
- AJH01
- ASF01
- LBI01
- YIV01
- YUM01
- [DescriptiveText] can be the call number, name of collection, a simple description, etc.
- Example: 20180816-AJH01-JJLYONS
- Add sequential number to end of folder name if exporting in batches
- Example: 20180816-AJH01-JJLYONS-001
- Set Format to “Digital Entities”
- DE-SELECT the “Include Streams” box
- SELECT the “Export Related Objects” box
- NOTE: These parameters ONLY export XML from DigiTool
- Click Next
- Click Confirm
3. Monitor the Export job
- Management → Maintenance → Monitor
4. Save Export job log once job is complete
- Search for Job log
- Management → Maintenance → Jobs List
- Job Name = Export Digital Entities
- Admin Unit = Partner whose objects are being exported
- Job Status = Completed
- Click eye icon under “Action” on the far left
- In the pop up window, choose “Log”
- Click eye icon under “Action” on the far left
- Copy and paste contents of log into text document and save with the name of the export folder.
- [YYYYMMDD]-[PartnerCode]-[DescriptiveText].txt
- Save file on Rosetta server at [PartnerCode]/migration/migration_logs
5. Move DigiTool export to Rosetta server
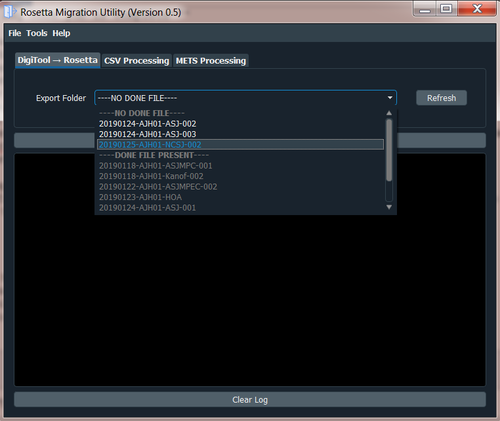
- Once the export is finished, locate [YYYYMMDD]-[PartnerCode]-[DescriptiveText] in the "DigiTool → Rosetta" tab of the Rosetta Migration Utility
- Click submit
6. Write Migration Note in DigiTool
- Management → Maintenance → Submit New Job
- Choose Assign Control Attributes from list
- Search for objects to update, click Next
- Parameters for job:
- Name = Partition C
- Value = ROS_YYYY_MM
CSV Processing
Used for migrating non-complex objects from DigiTool to Rosetta.
Requirements
- CSV template
- Current template version is available for download here.
- An export folder from DigiTool that is organized into “digital_entities” and “streams” subfolders.
- This organization is the default structure of DigiTool exports.
Process
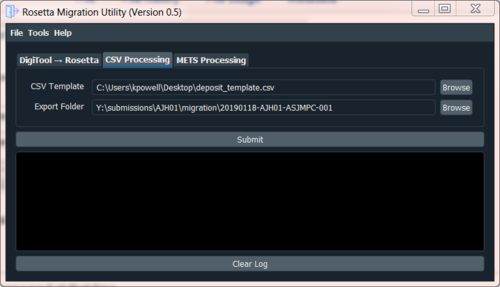
1. Supply path to CSV template
2. Supply path to export folder
3. Submit
- The log will provide the path for the deposit folder.
- This process extracts the technical and administrative metadata exported by DigiTool and creates Metadata Update files. These files will be used to update the migrated objects' metadata once they're ingested into Rosetta.
- An example of a successful DigiTool Migration process log can be viewed here.
METS Processing
Used for migrating complex objects from DigiTool to Rosetta.
This process takes significantly longer than the other migration workflow. It creates METS files which includes technical, administrative, and structmap metadata.
Requirements
- An export folder from DigiTool that is organized into “digital_entities” and “streams” subfolders.
- This organization is the default structure of DigiTool exports.
Process
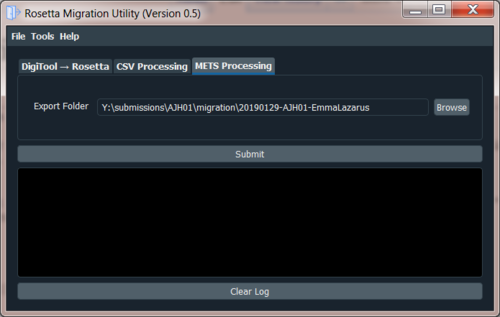
1. Supply path to export folder
2. Submit
- The log will provide the path for the deposit folders.
- An example of a successful DigiTool Migration process log can be viewed here.
ALEPH Reconciliation
1. Update MARCXML Batch.
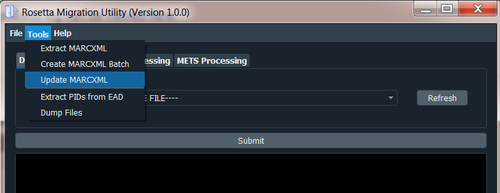
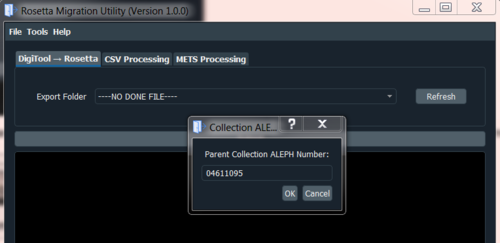
- Open the Rosetta Migration Utility and go to Tools --> Update MARCXML. Locate the MARCXML Batch.
- If these MARCXML records are associated with a parent collection, add the ALEPH System Number for that parent collection in the pop up window.
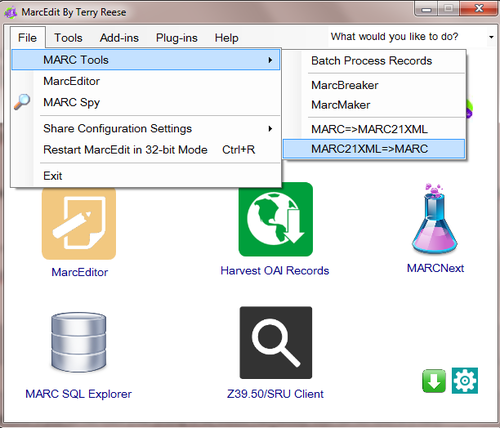
2. Open MarcEdit. Go to File --> MARC Tools --> "MARC21XML => MARC"
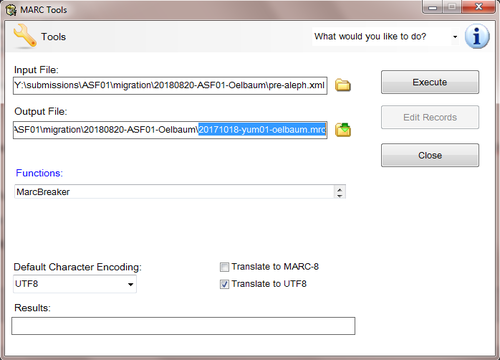
- Under Input File supply the path to the updated MARCXML batch file.
- Under Output File supply a path for a new .MRC file.
- Use the [YYYYMMDD]-[PartnerCode]-[DescriptiveText] naming convention, but make sure it is entirely in lower case. Aleph does not like capital letters in input file names.
- Make sure UTF-8 is chosen as Default Character Encoding
- Click Execute
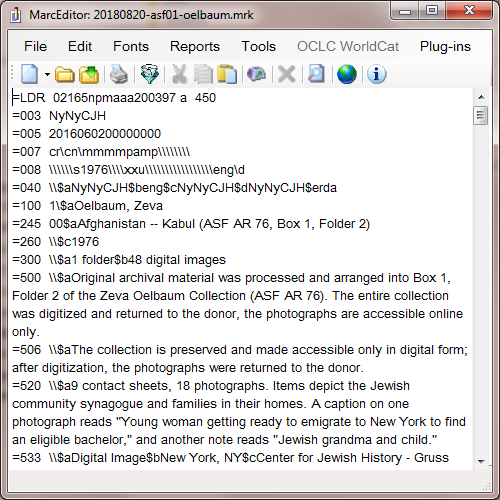
- After the MRC file is created, double click it. This will open MARC Edit again and prompt you to create a human-readable MRK file.
- Open the MRK file to double check the MARC records. Make sure there aren't bad leaders in a record. You can do this by doing a "Find All" search for "=LDR" and looking for "^" symbols.
- If there are bad leaders, contact the Rosetta Systems Administrator
3. Upload MRC file to the ALEPH server
- /exlibris/aleph/u22_1/cjh01/scratch
4. Open Aleph and follow ~ THIS GUIDE ~ for adding records.
- Write down the name of the log file created during the manage-18 job. This can be used in the next step as the input file.
5. Follow ~ THIS GUIDE ~ for downloading MARCXML from ALEPH.
6. Add ALEPH system numbers to deposit CSV
- Open Command Prompt
- cd into the directory containing add_aleph_sys.py
C:\> cd C:\Path\To\script

C:\Path\To\script> py -3.5
Python 3.5.0 on win32
>>> from add_aleph_sys import *
>>> csvfile = r'C:\Path\To\DepositCSV.csv'
>>> xmlfile = r'C:\Path\To\DownloadedAlephXML.xml'
>>> add_aleph_num_CSV(csvfile, xmlfile)
>>> 'C:\Path\To\EDITED_DepositCSV.csv'
Rosetta Ingest
1. Copy the [YYYYMMDD]-[PartnerCode]-[DescriptiveText]_deposit folder to the appropriate submissions folder.
- For the simple Migration workflow (CSV)
- submissions\[PartnerCode]\CSV
- For the complex Migration workflow (METS)
- submissions\[PartnerCode]\METS
